|
Glassing
PREPARATION
The quality and smoothness of the board's final surface depends first on careful preparation of the core structure and first fiberglass layers. Glass the top first. Put the core structure up on level glassing stands. Make sure the support points aren't going to push any of the ribs out of place. Add extra temporary support stands between the main glassing stands if necessary to keep the rocker curve from bending out of shape. (Sometimes necessary for longboards.) Cover all stands with plastic, so if epoxy drips through the structure it won't become glued to the stands. Do a final alignment check. Make sure all ribs are fully seated in stringer notches. Then, looking down at the rail pieces from above, make sure they all radiate out at the intended angle. Then get your eyes down at rail-level and walk around the board to check that all rail pieces are also aligned from this perspective. The following video covers most of the remaining preparation steps. APPLY EPOXY
The smooth state of the dry fiberglass draped over the core is obviously a very delicate arrangement. To maintain those smooth contours and minimize dimpling or sag into the core's open cells, in applying epoxy to the fiberglass with a brush, we need a light touch, swift action, and constant adjustment to just how much epoxy is being applied. The epoxy takes some time to fully soak in and spread, so you need to keep an eye on what you've already done to get an idea of if you need to apply less or more epoxy to the section you're working on at the moment. The more words and thought you throw at it the more impossible it seems. But don't sweat it. Just go for it. You'll make a few mistakes, but the technique should become obvious as you work. Here's a video showing my applying epoxy. Glass Amounts
Recommended glass amounts that will give reasonable weight and good strength:
Longboard:
Shortboard: First lam is the lamination that goes directly on the hollow core. So you have first lam top and first lam bottom. Second lam is applying another layer of fiberglass and epoxy directly over the first lam. Doing a second lam is pretty much like doing a conventional lamination on a foam surfboard core. Right now I like these 16/14 and 14/10 combinations, but I don't think I've really found what's ideal or what's minimally sufficient. Resin Amounts
How much epoxy for the first lam? I don't know exactly. Because I've been mixing epoxy in small batches, and because I often dump the last ounce or more for various reasons, I don't have a good figure here. If you use my first lam approach, mixing up small amounts of epoxy at a time, you won't need a total ounce number to get the job done. If you're trying some other method of applying resin, like a spray setup, or some other efficient applicator, or a resin with a really long pot life, and you want to do a whole side at once, in one batch, I would initially budget 3 oz, or maybe 3.5 oz of resin per foot of board. (Still assuming you're only working on one side of the board at a time.) Then, hopefully, you can adjust the amount down from there, once you see what it really takes. Cutlaps
After the first lam on the top (the first first lam), cut off the excess glass along the tape line. For the first lam on the bottom (the second first lam), you can either do a free lap or a cut lap where the second lam glass wraps around the rail and then overlaps the glass on the other side from the first first lam. This video starts by briefly showing the trimming of the first lam on the top with a box knife, slicing away the excess glass right at the rail shadow line, along the tape line there. (You could use a Dremel tool with a cut-off disk instead. Wear safety glasses for that though.) It then goes on to show how to set up and do a cut lap for the first lam on the bottom, where the bottom lam wraps around to overlap the top. Drips - Cut and Grind
After trimming the excess glass and tape away fromt he first lam on the top, there will likely be some excess resin clinging to rail pieces where the resin flowed under the tape. This excess resin may stick out beyond the rail piece edge. You'll need to cut or sand this down to make sure the glass draping over those rail pieces drapes smoothly and doesn't snag when you're preparing the glass for the first lamination over the bottom of the board. Likewise, look for any resin drips that might have gone through anywhere else on the bottom of the board and sand those flat too. First Lamination Thickness
Due to the difficulty of cutting the lap with a blade, I wouldn't recommend doing more than 14 oz for the first lam (generally on the deck). (If you use a Dremel tool however, first lam thickness isn't much of an issue here.) Usually I do a 10oz first lam as a layer of 6oz under a layer of 4oz. So, for 16 oz, do 10 oz (6+4) for the first lam and another 6 oz layer later, in the more conventional way, with a spreader - which brings up second lams: Sand Off Cut or Free Lap Edge, and Other Bad Edges and Lumps
After every fiberglass layer application is hard, sand off irregularites like cutlap lines or extra bunches of folded or overlapped fabric, so the next layer of fiberglass or resin will go over a fairly smooth surface. Second Lamination(s)
When applying additional layers of fiberglass you will simply pour epoxy onto the fabric and spread it with a squeegee, or plastic spreader, in the conventional way. Do not pour all the resin at once and let it sit there in a thick puddle. Your first lamination has numerous pin holes and the pooled epoxy will seep into them. Instead, pour your batch of epoxy in a few quick stages and roughly spread each stage out just after you pour it. A thinner layer of pooled epoxy is much less likely to seep through the pin holes. Hot Coat
Do the hot coat with epoxy. I know no other way, but I understand that some people put polyester hot coats over epoxy laminations. I don't think that makes sense for these boards. You want the good bond and added strength of an epoxy hot coat. Consider doing two hot coats. This gives you more room to sand the surface smooth before you start hitting the glass. Sand the Hot Coat
Try to get the surface to it's final smooth shape. Try to sand out every bit of glossy surface - but without sanding into the glass weave. This might not be possible. Better to leave some glossy depressions than to sand through the glass at the high points. You don't want to sand into the glass if you can help it. If you're sanding and hitting the glass a lot, and still not scratching the surface in the middle of the hexagon cells, you should probably stop sanding, blow off the dust, and apply another hot coat. You might even consider adding more glass patches if you've done too much damage with your sanding. (I've had this happen a couple times. The second hot coat gave good results.) Sanding the hot coat can take hours, and takes constant attention and careful handling of the sander. But it makes a significant improvement in the final smoothness of the board's curves and surfaces. Find All Pinholes and Sand-throughs
After sanding the hot coat wipe off all the dust and carefully inspect the entire board surface, but especially around the rails, for pinholes or larger areas of too-thin glass that needs patching. Tape around all these areas so you'll be ready to patch them at the same time you're working on fin/box/vent installs. Mount Fins, Install Vent, Patch Holes
See the vent install page. See guides elsewhere on how to do glass-on fins. If you're doing fin plugs or boxes, now might be the time to work on that, though after the first lam might be a good time too. You're off in experimental territory with that though. It's up to you to figure it out and make it work. I like glass-ons. You'll have extra wet epoxy and glass scraps around as you work on the vent and fins, so when you finish that work, use the excess to patch up pin holes and sand-throughs. Sometimes just a drop of epoxy is enough, sometimes some epoxy mixed whith sanding dust or some finely cut glass fibers works. For bigger holes you'll want to lay some little glass fabric patches over them. Sand all this fin, vent, and patch work smooth. These are the last details of your final board shape. It's usually a lot of hand sanding at the end, bending the sandpaper around you fingers, rubbing everything into one smooth continuous surface. Gloss
I always do a final epoxy gloss coat. I don't attempt to sand and polish it - I just leave the epoxy's natural glossy finish alone. I've started to move the gloss tape line/bead up higher on the rail, out of the water flow area. A minimal, clean bead, really high on the rail almost looks like a pinline. 'Course I meant to do that. Clear pinline. Cool, huh? Otherwise you might want to carefully sand down that bead for a smooth, but not entirely glossy rail. Keep the bead sanding area narrow, and then go over it it with increasing grits, up to maybe 400 or 600, and it should get pretty inconspicuous. Surfer Steve asks you to consider skipping the gloss coat, and all the intermediate sanding. So far, I've found that the hot coat sanding and final gloss coat are required for these boards, to partially smooth inherent lumpiness caused by the core, and to build up enough layers of epoxy to plug all the pin holes. Timing
Because of the way epoxy cures, you don't need to sand between coats if you apply the next coat within a day or two (and you're using a blush-free epoxy). But the sooner the next coat goes on, the better the bond between the two coats will be. So you want to plan your resin application sessions in a way that lets you get to the finished hot coat as quickly as possible. You're going to sand the hotcoat anyway, so once you get it on there, you can take a break in your build schedule. Plan to do at least two epoxy applications a day, alternating the side of the board you're working on, so no coat cures too long before the next coat tries to bond with it. I'll include a sample glassing time schedule with these instructions. Pin Holes
There will likely by many pinholes after the first lam. Any subsequent lams will plug most or all of these. Hot and gloss coats should plug any that survive. A first lam (with no second lam) with a hot coat will probably still have some holes. After sanding the hotcoat and applying a gloss coat, remaining pinholes will probably be filled. But don't be confident they have. To help the gloss coat plug any pin holes that might have survived, do this: After sanding the hot coat, just wipe the dust off with a fresh, clean, dry towel - don't blow the dust off, just wipe it. The thought here is that any holes or deep tiny dimples that might have survived might hold a bit of dust that will plug the hole or give the resin a sort of bridge to cling to so it can cover the hole when the gloss coat is applied. Pin Hole Patrol During Gloss Coat
Closely inspect the board for pin holes as you do your final gloss coat. Yes, you should have already patched all these. But maybe you missed a couple. If dropping more resin on them doesn't plug them (and usually it doesn't - they open again in a minute or two) you can plug them with a tiny scrap of tissue paper while the epoxy is still wet enough to flow easily. With tweezers or a toothpick, manipulate the piece of tissue so that it lays flat on the board surface over the hole. This will be enough to plug it. The tissue's absorbent nature will let the gloss coat flow over it and make the tissue patch almost undetectable. The edges of the tissue might try to to bend or curl up. Make sure the little piece is cleanly cut and flat to start with and maybe this won't happen. Post Cure
You don't absolutely need to post cure your board, but I would recommend doing something like this to harden it up faster: Be sure to open the vent, if you installed a manual vent rather than a goretex vent. If you didn't install a vent, drill a tiny vent hole for this post cure procedure, and patch it later, after the board has cooled. Put the board out in the sun, covered with black plastic, black cloth, large dark beach towels or something like that, to help it collect heat. Have this dark covering drape over the sides to the ground, or otherwise arrange for it to enclose the board in a tent or cocoon like arrangement, so the board and airspace under the covering can build up some heat. Have the board on a soft surface, like a bunch of folded beach towels, supported along most of its length, because the heat will probably soften up the epoxy somewhat, and if the board is in some stressed position, it might warp slightly, or you might get indentations in the surface if it's only supported at a couple points. Leave it out for several hours. Maybe flip it once. 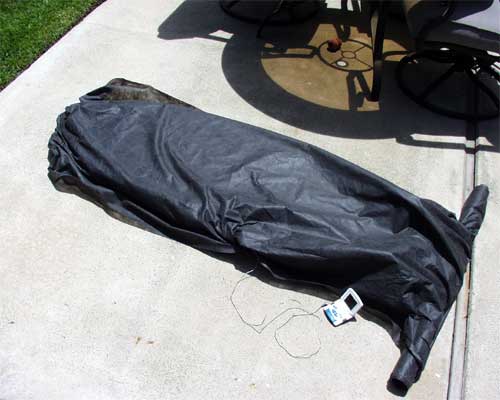
That is two layers of black landscaping ground cover fabric blanketing a board. 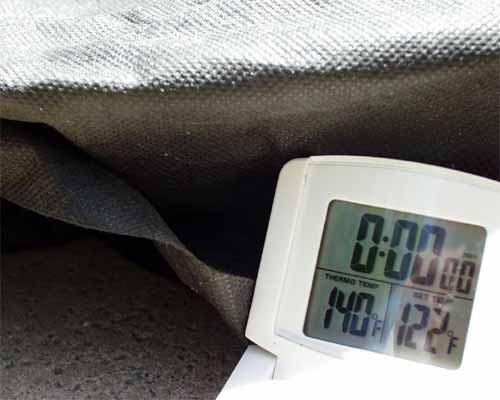
The temperature under the cloth got to 140 deg. F. on an 80 deg. day.
There's a helpful but inconclusive discussion about post-curing room temp-curing epoxies over on Swaylocks.com. |